|
Today I'm introducing a new project. Over the coming days and weeks I'll post more details about specific steps, features & functionality, and deployment to Azure. This post is to explain the high level details and workflow. The app is going to be a simplified payroll processing engine. There is going to be a very simple web front end, an API, a database, message queue, and the actual payroll engine. The main goals for this project are 1) to determine the difficulty in integrating multiple different languages together and 2) how to use Octopus to deploy everything to Microsoft Azure. I mentioned that I want to use different languages, but which languages? My plan is to use simple HTML and Javascript on the front end, C# and Web API for the middle API, Microsoft SQL Server for the Database, Azure Service Bus as the message queue, and finally I want to write the Payroll Engine in F#. The main focus of the project is the API, Message Queue, and Engine. So I chose to just so something simple with the front end so I could focus more on the back end and deployment aspects of the project. With the language basics out of the way let me explain the overall design. 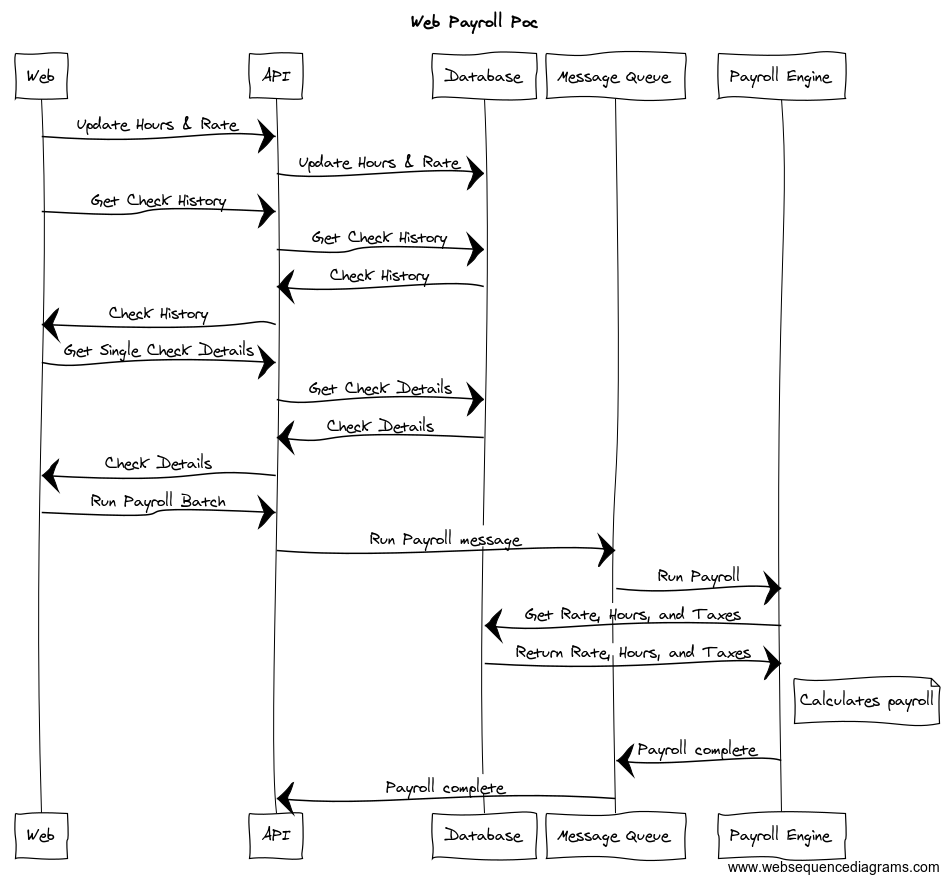 Imagine this as a payroll system for a small business. The employees of the business can have 1 of 2 roles. They can be either a regular employee or they can be an administrator. The admin role is a super set of the regular employee so they have all the same functionality as the employee plus the ability to update employee rates and run payroll batches.
For the standard employee role they can only get the details for a single check and view a list of all their past checks. Since these are simple read operations the user makes their request via the front end which calls to the API and which queries the database. The admin user can also update employee hours worked and also their current hourly rate. These are also simple CRUD operations so the API will talk directly to the database. So far nothing new or exciting here. Things start to get interesting when the admin wants to run a payroll batch for N number of employees in the company. When the time comes to run payroll so that employees can be paid things start to get more complicated. Running a payroll for an entire company or even a subset of employees can be a very long running process. This is were having a separate payroll engine can really improve things. Imaging you are the admin in charge of running payroll so everyone gets paid. You know that it takes awhile to calculate everyone's taxes and deductions but you don't want to bring down the API with such a long running process. This is where the message queue comes into play. When the admin wants to run a payroll, they will select all the employees and click the magic go button. The API will then add a message to the queue and stop there. The API won't be blocked waiting for all the payrolls to run and other employees can still view their check details and history as normal. It is very important that you use the message queue rather than a service bus with topics and subscriptions. The reason is that a queue will guarantee that only 1 worker (the payroll engine in this example) picks up the message and runs the payroll. Once the message is on the queue the payroll engine picks it up and gets the information it needs from the database. Then it begins the process of calculating the payroll. Once it is complete it publishes another message to the queue which is picked up by the API and then the customer is alerted that payroll is complete. We could have the API calculate the payroll to save design complexity, but I think splitting the workload like this provides more benefits than the drawbacks. There were two main problems that I wanted to solve, the first was scale. By splitting the engine out of the API you can scale both pieces independently of the other. The second problem that needed to be solved was time. Running a payroll is very complex process and it can take a very long time to complete. Using the message queue decouples the payroll engine from the front end and the API. The engine can take a long as it needs without impacting other users and the admin can close the browser window and go about their day until they get the message that payroll is complete. That's it for the introduction. Thanks for sticking with me this far. In the upcoming posts I'll go into more detail about each piece of the application and why I chose the language that I did. That's it for now. As always, Happy Coding. I've been toying around with native iOS development using swift on and off for about a year now. One topic that I haven't looked into as much is how to do automated testing. I've looked at XCTest but I just don't like that I have to start all of test names with the word test. I believe that the test name should descriptive of the work being tested and appending each test with the word test does not make sense to me. So after some searching I came across Quick and Nimble test frameworks. I'm coming from hybird mobile development and using Jasmine to test my JS files. So the Quick and Nimble structure is just like Jasmine with nested describes and it statements to structure your tests. So that combined with not having to append each test name with test was enough for me to go a little deeper with Quick and Nimble. I thought I would write this brief post about my experience setting up a sample application with Quick and Nimble to help anybody else out there looking for something besides XCTest. Be sure to checkout the finished project at my GitHub.
Intro and Pub/SubThis is post is going to be a little different. This time I'm going to show off a coding sample that I did for a company awhile back. The full code sample can be found here at my github. So the challenge was to create a solution that could process a remote file and use the data to answer a series of questions. Some of the things that I had to keep in mind were resource utilization, testing, ease of maintenance, and extensionability, add to be easy to add additional questions. Before I started I downloaded the files to get a feel for the data. Now I was told that the data was health care related, but was not told what the columns within the data meant, that was part of the challenge, so I had to do some additional research and infer as best I could. I found that one of the files was a CSV containing some information about medical practices within the UK. The second file, also CSV, was the prescriptions associated with each practice in a certain month. After some additional research I was able to a mapping for the columns in the second file to what they meant in the real world. Now armed with this information I was ready to start coding. As I was thinking about the structure of my code and what steps I would need to take I determined that there were two operations that I could not avoid. The first was that I had to process each file line by line in order to parse the data into something I could use in my code. The second was that I had to rerun the calculations for each question after each record was parsed. I could not just stop processing or skip certain objects since it could impact my calculations. Keeping the requirement of resource utilization in mind, one thing that I did not want to do was walk through each file line by line, parse that line, add that object to an in-memory collection, and then once I was done with the file walk the in-memory collection to do the calculations. I felt that would be bad for 2 reasons, 1) that I would be holding all of the data in-memory and 2) that would add many more operations (in addition to the two already identified) as I would have to walk the entire practice collection and the walk the associated prescriptions for each practice. With that in mind I decided that I wanted a way to do the calculations as soon as each record was done processing. My first thought was to use an event based model. I would raise an event as soon as each line was parsed. That would give me the benefit of redoing my calculations with each new object. The thing I didn't like was that I felt the event model would cause very tight coupling between the file that handled the data source and the file(s) that did the calculations. So I went looking for another answer. Finally, after some more thought and internet searching I landed on the Pub/Sub model. I chose the Pub/Sub model because it gave me the real time calculations I wanted without coupling my data source files to my calculation files. I added the Pub/Sub NuGet package to my solution (version 1.4.1 at the time) and was off to the races. Pub/Sub was super easy to implement. The package is a set of extension methods off of the base Object class so all of my entities had the publish and subscribe methods readily available to them. As you can see it was very simple to publish that an entity (practice in this example) was done being parsed. private void ParsePracticeFromStreamData(Stream downloadStream) { try { using (var stream = new StreamReader(downloadStream)) { string line = String.Empty; while (!stream.EndOfStream) { line = stream.ReadLine(); var prac = Mapper.Map<Practice>(line); this.Publish<Practice>(prac); } } } catch (Exception e) { _logger.LogException(MethodInfo.GetCurrentMethod().Name, e); } } In this method I'm taking the download stream and reading each line, using AutoMapper to map the CSV format to my entity and then Publishing the new Practice object. Since the publish sends out the practice object anybody that is subscribed to the practice will receive the practice object and can do whatever calculations they need. Subscribing to an event is just as easy. If one of the calculation files needed to handle practice data then in the constructor I would just subscribe like this. public BusyPractice() If a file did not need to do anything with the practice data it would not subscribe and then would not be notified. That's my Pub/Sub code in a nut shell.
As part of the Udacity's iOS Development with Swift Nanodegree program, I've been working UIActivityView's recently. The UIActivityView is typically used to share things via email, SMS, as well as iCloud. The built is functionality is great and covers my needs for this project. The issue that I've come across is that I want to wire into the completion event and do some things, like dismiss the view controller, whenever the user has successfully shared something. So have digging a bit I came across the class reference for UIActivityViewController on Apple's website. Beginning in iOS the CompletionHandler property is deprecated and it is recommended that you use the CompletionWithItemsHandler so that is what I'll be using. The CompletionWithItemsHandler property is a typealias that will pass 4 parameters, 3 of which are optional, to handler you create. The four parameters are (in order): activity of type String?, completed of type Bool, returnedItemd of type [AnyObject]?, and error of type NSError?, for a more complete definition see the Apple reference page that I linked earlier. Only bool is required and that is the property that I care about for this exercise. The completed property does pretty much what you'd expect it to do. It is true when the action was successful and false if the action was not successful or if the user canceled the view without taking an action. I'm using a closure to wire up the completion event. Here is my code to create the view controller and wire up the completion event. let activityView = UIActivityViewController(activityItems: [meme.memeImage!], applicationActivities: nil); And that's about it. Nothing too fancy just a simple way to wire up to the completion event handler for the UIActivityViewController and do something before dismissing the view controller. If you wanted to log the by checking if the error is not nil. For my purposes right now I don't care about the errors so I will be removing that in my code. You could also use the activity parameter to do different things based on which activity the user took. Finally, the returnedItems arrays is an array of NSExtenionItems. The array contains any modified data for the activity items that you supplied when you initialized the activity view controller. If no data was modified then this parameter will be nil. I hope that helps and as always. Happy Coding.
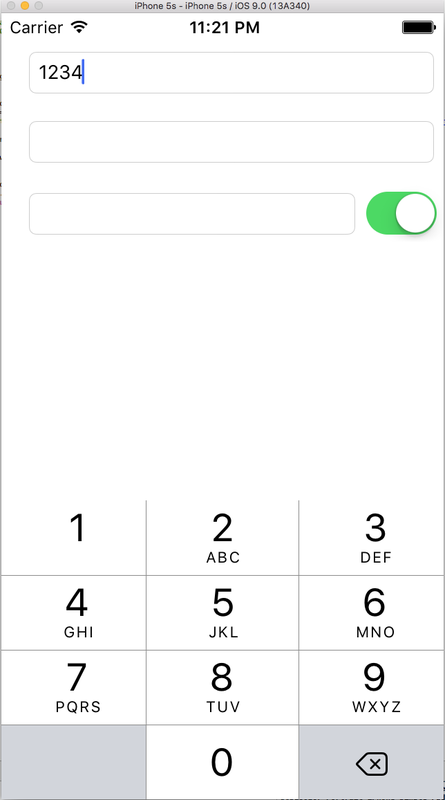
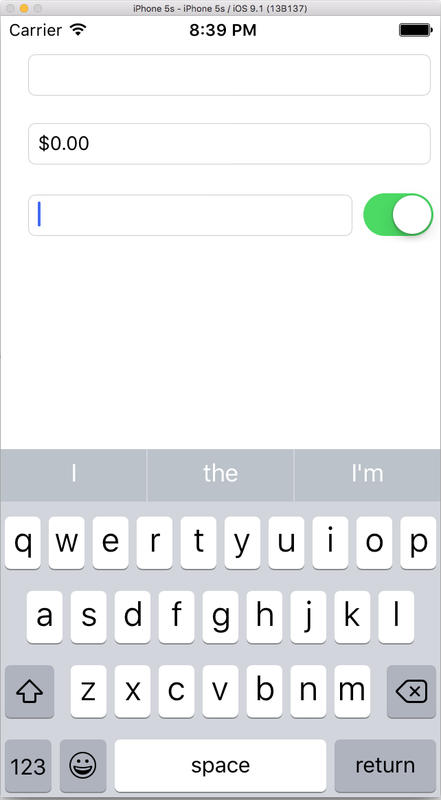
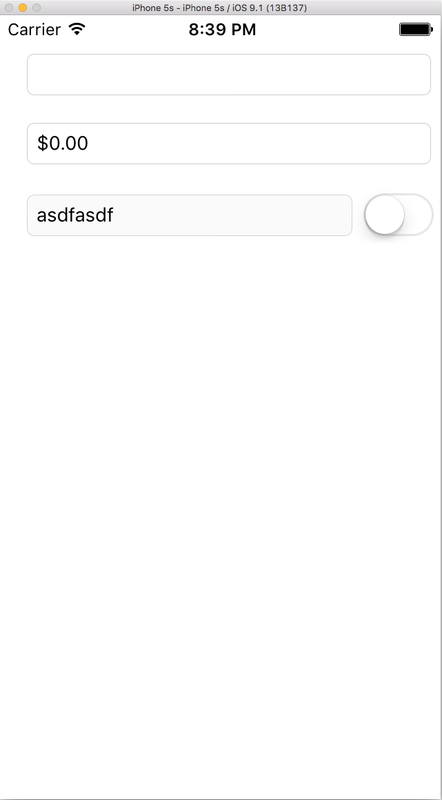
This is the 3rd and final part of the challenge app for Lesson 3 of Udacity's UIKit Fundamentals I course for their iOS Developer Nanodegree. This piece was so simple that I thought about just including in my previous post but decided to make another very small, short post about it. As a refresher here is my UI on initial load.  Since this textfield also interacts with another control I decided to just use the primary view controller as the UITextFieldDelegate, instead of creating a different class like I did for the other two textfields. Here is my entire view controller for this storyboard. As you can see there isn't much there. 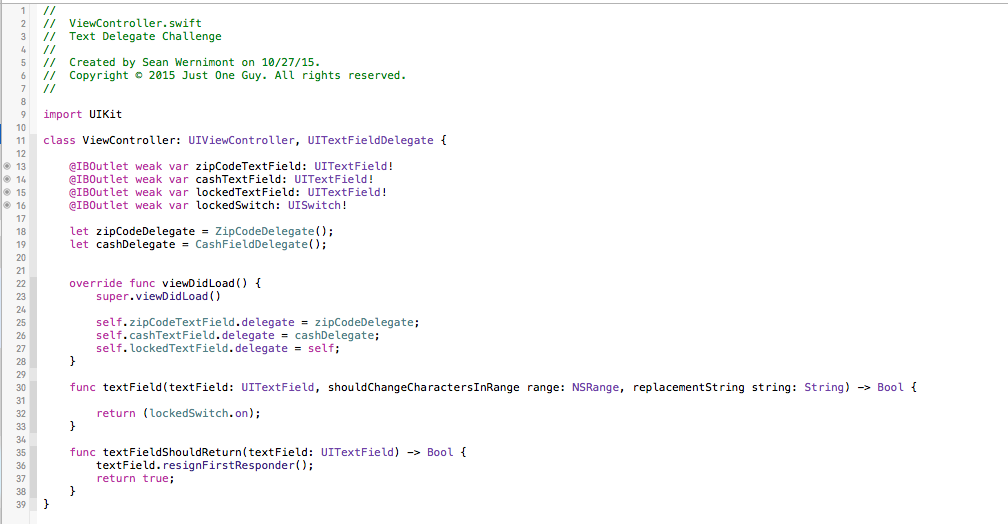 I didn't change the keyboard type for this textfield because there isn't any kind of limit on what can be entered into the textfield. Since I had an outlet reference to the switch I simply returned the value of the switch at line 32. If the switch is on then text can be entered, if the switch is off then no text can be entered and also no text can be removed. The textfield is completely locked with the switch in the off position. I could have created an outlet action for the value changed event of the switch and then set the enabled property of the textfield but since the challenge was to work with UITextFieldDelegates I decided not to do that. Just for reference here is the same view controller with the delegate logic commented out and using a switch action instead. 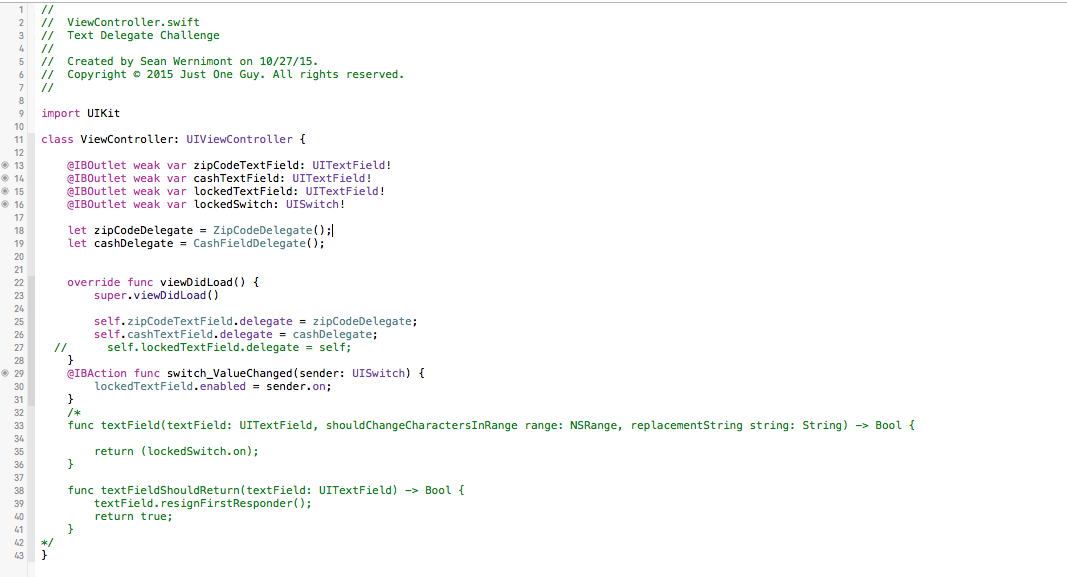 The left side is the app with the switch on and textfield enabled. The right side is switch off and textfield disabled. If you like the look of the disabled textfield you could also expand the delegate method and at line 31 of the second screen shot add textField.enabled = lockedSwitch.on; I just choose not to do that.
I hope you enjoyed this short series on working with UITextFieldDelegates. My current plan is to continue write up small, short posts as I go through each lesson within each course and then create another post(s) for the project that I will submit for each course. That is my plan, but we'll see how well I follow through with that.
Here is my github repo for this specific work. https://github.com/swernimo/iOS/tree/master/UI%20Kit%20Fundamentals%201/Text%20Delegate%20Challenge. Check out all my repos and follow allow with me as I learn Swift. Good luck and happy coding. This is the second part of the lesson that I posted previously. This post will focus on creating the fill from right cash text field. As a reminder, the fill from right cash field always displays the dollar symbol, something in the ones place (0 on initial load) and fills in the text from the right side. So on first load the text field shows $0.00 then if you were to enter 5 it would show $0.05. If you entered 1-5 then it would show $5.15. So let's dig in. To start with I set the keyboard type to Number Pad like I did with the zip code field in my previous post. Here is my first attempt at this problem. 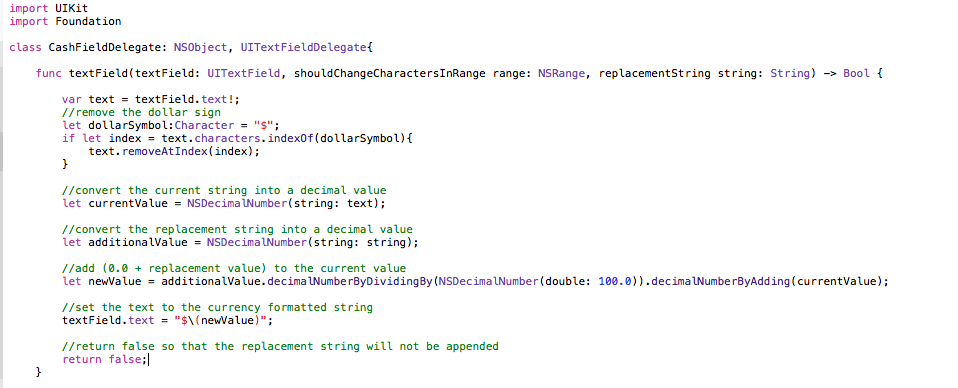 I'm not too far off. With that code there is a bug in how the new value is being calculated. As it stands if you have $5.15 and then enter 2 you will get $5.17 instead of the desired $51.52. On a side note does anybody know of an easier way to problem math operations on NSDecimalNumbers? Personally, I don't like that syntax. I think it is more difficult to read than this. But as you can see it generates a compiler error so I switched to using the built in methods off of NSDecimalNumber.  I don't know if it is because I'm new to the language (very good chance) or because of how the language is designed using the methods off of NSDecimalNumber doesn't read as clearly to me as just using the symbols like I would in C#. 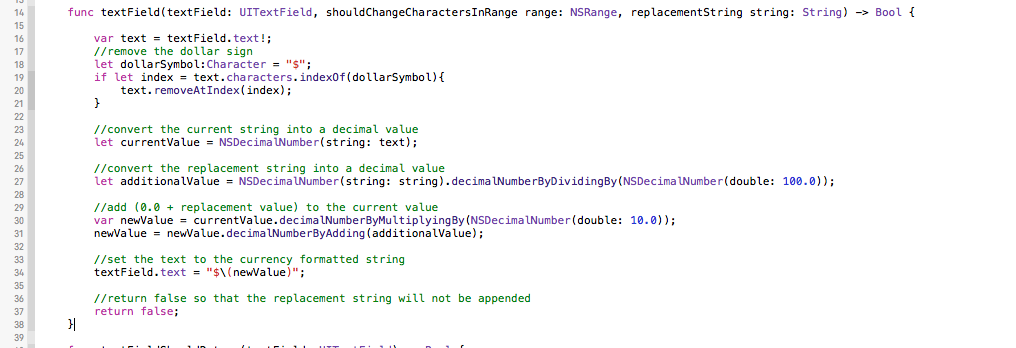 I made a few changes and now everything seems to be working. If this were some production code I would certainly want to add unit testing around this, but it is good enough for this. I moved the logic to divide the new number of 100 onto the line 27 where I am creating the additionalValue variable as a NSDecimalNumber. Then on line 30 I take the current value and multiple it by 10 to free up the last digit and finally on line 31 I add the new additional value, created on line 27, to the current value. I hope that makes sense to you. If not let me and I'll try to clarify it. Thanks for reading and happy coding.
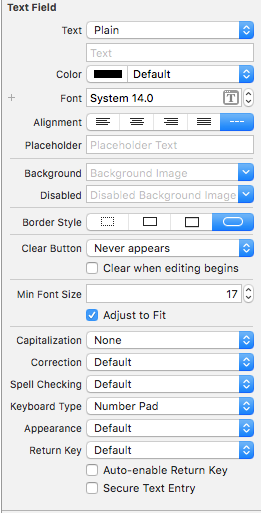
Right now I'm working through Udacity's iOS Developer Nanodegree program. We're using Swift 2.0 and so far I'm really liking the program. I am currently working through the second course (UI Kit Fundamentals I) lesson 3 challenge app. This challenge app is working with UITextField Delegates. The challenge app consists of three textfields. The first textfield is a zip code field with a character limit of 5 and a numeric keyboard. The second field is a money field that contains a dollar sign at the left that always shows 2 places after the decimal. The text is filled in from the right and is appended onto the amount. So for example if you already entered $1.05 and then enter 3 the new value is $10.53. The final textfield is paired to a switch control. When the switch is on the textfield is locked and cannot be edited, when the switch is off then the textfield can be edited. I started working on the first textfield so that will be the focus of this post. The first thing I did was change the keyboard to numeric only.
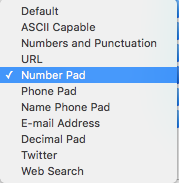
To change the on screen keyboard first open up your storyboard and selected the text field. Next expand your Utilities Panel (if hidden) and go to the Attributes Inspector. From there you can change the Keyboard Type (left screen shot). Now there are a number of other options for keyboard type, as you can see in the right screenshot, but for this project I chose Number Pad.
In .Net all string objects are also character arrays. This was the case until Swift 2.0, read Apple String Reference before for more information about why that was changed. The String object in Swift 2.0 now exposes a characters property that is the characters array. When you're working with the UITextFieldDelegate the function includes the textfield object, the range and the incoming string. Since I wanted to limit the number of characters to 5 I first needed to get the number of characters in the string. In the first screenshot the text (the local variable text) property of the textfield would be "1234" with a character count of 4. Now if I enter 5 the string parameter will have a value of 5. So I can simple add the existing length (4) and the length of the new string (1) and check if the new length will be less than or equal to my limit of 5. Which it is in this case so the method returns true and the new string is added to the existing string. If I already had 5 characters then the method would return false and not allow the new string to be appended.

Now this is a very simple use case. I didn't even touch the range object and I didn't do any kind of string manipulation. I just limited the number of characters. One thing you will notice if you were to run this code in the simulator is that even though the on screen keyboard is showing only numbers you can use your physical keyboard to enter non numeric characters. Since the on screen keyboard is limited to numbers I decided not to worry about it. I hope this was helpful to you. Happy Coding.
Here's a scenario that I ran into frequently when I was working in web forms. Let's say that you have form with some controls on it. Now let's say that you need to reset that form based on some user action or an event. Let's assume this is the markup of your aspx page. <%@ Page Title="Home Page" Language="C#" MasterPageFile="~/Site.Master" AutoEventWireup="true" CodeBehind="Default.aspx.cs" Inherits="WebApplication1._Default" %> Now inside your reset method you could go over each textbox one at a time and reset the text, like this, but I don't like that approach. protected void btnReset_OnClick(object sender, EventArgs e) First I think it takes too much repetitive typing and second you have to modify the method if you add another textbox. Now if you look closely there is another problem with this approach. I missed that zip code textbox. It is pretty easy to miss a single textbox. Now imagine if your page also had other controls like checkboxes or radio button groups. You can see that the reset method would quickly grow to be a large method. Let's see if we can find a better way. What I did was to create a static helper class and inside that class create a static method that will return all of the children controls of a given type. Here is the code for the helper class. public static List<T> GetControls<T>(Control root) Now you can change your reset method to simply call the helper method. In addition you don't have to change your reset method every time you add a new textbox. Let's see the GetControls<T> method in action. protected void btnReset_OnClick(object sender, EventArgs e) Much better. You don't have to worry about forgetting a control or changing your reset every time you change your aspx page. In this example I'm pointing the GetControls method at the root Page. You could just as easily point it at another control, like a table or a div, if you only wanted to clear a subset of the controls. Hope that is helpful for you and as always, Happy Coding.
To display the page numbers in Xcode (currently I'm using Xcode 7.0.1) simply go to Xcode > Preferences > Text Editing. Then check the box for Line numbers. It is that simple.If you want to be able to collapse a function, so you only see the signature, then check the box for Code folding ribbon. 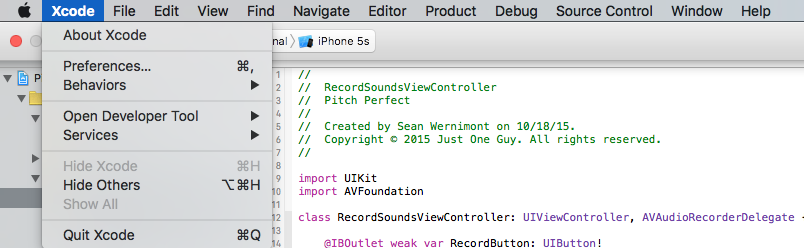 Personally, I don't know why this option isn't checked by default. The option to highlight a section of code when you hover over that area in the left side bar (the bar that you click on to collapse or expand a function) is Focus code blocks on hover. 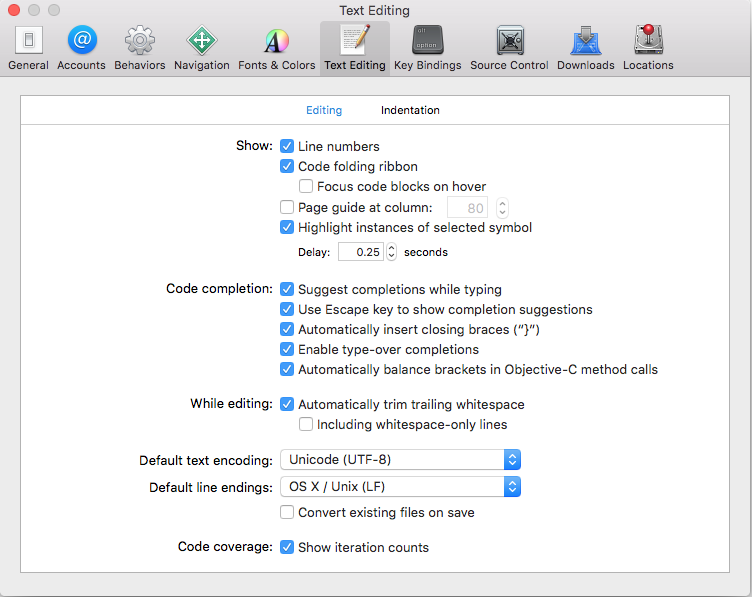 Personally, I find it really annoying when the code highlights so I have that option unchecked. Happy Coding.
|
AuthorWelcome to The Blind Squirrel (because even a blind squirrel occasionally finds a nut). I'm a full-stack web and mobile developer that writes about tips and tricks that I've learned in Swift, C#, Azure, F# and more. Archives
April 2018
Categories
All

|
 RSS Feed
