|
In my previous post I walked through the initial creation of a Register User Logic App, checking if the user already exists, and then returning an error if they are already registered. Today I'm going to cover validating the password against a set of rules (and what happens if that validation fails), inserting a new record into the database and finally returning a success response back to the user. Without further ado, let's get started.
Password Validator Function
To begin I'm going to create a new Azure Function that will handle the password validation. I'm going to use my Simple Password Checker as the basis for the function. Since I know that this user isn't registered I deleted the check for previous password. The Char.isSymbol is a little weird, it didn't match on the ! symbol like I would have expected. Check out the MSDN reference for more information about what symbols are supported. Below is the completed code for the function. Now that we have the function created, it's time to go back and edit our Register User Logic App.
Password Validator Function
Updating the Logic App
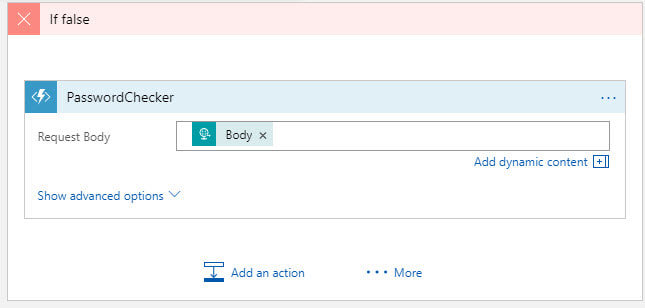
We already handle the if condition (the user is already registered) so now we need to handle the false condition (new user). Let's add an action that will call the function we just created and pass in the original request body. First click on 'Add an action' then select the Azure Functions connector. Next select the Function App name then the individual function you want to call and finally pass the request body to the function. Since this function can return different status codes we need to add another if condition inside the current if false condition.
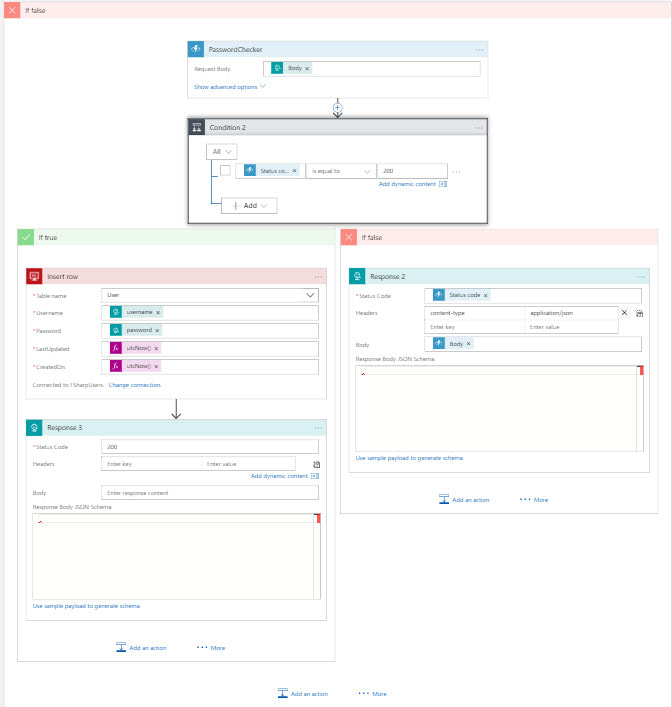
We will use the status code returned from the function as the basis for our decision. If the status code is 200 that means the password is valid and we can insert the row into our database. We are passing in the username and password that we received from the body of the original request and using utcNow() function for the two date fields. After we insert the row we are returning a success response to the user so they know they have registered their account. If the status code is anything other than 200 we are returning the status code and any messages to the user.
Testing
Time to fire up Postman and test out the workflow. I copied the URL from the trigger for the logic app and pasted it into postman. First I tried a new user with an invalid password. I kept getting this strange message about the condition failed. So I tried to register a new user with a valid password. When that worked first time next I tried a duplicate username and I got the error I was excepting. So after a little digging I found the answer.
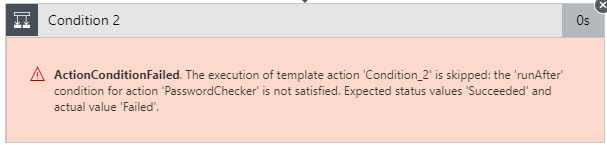
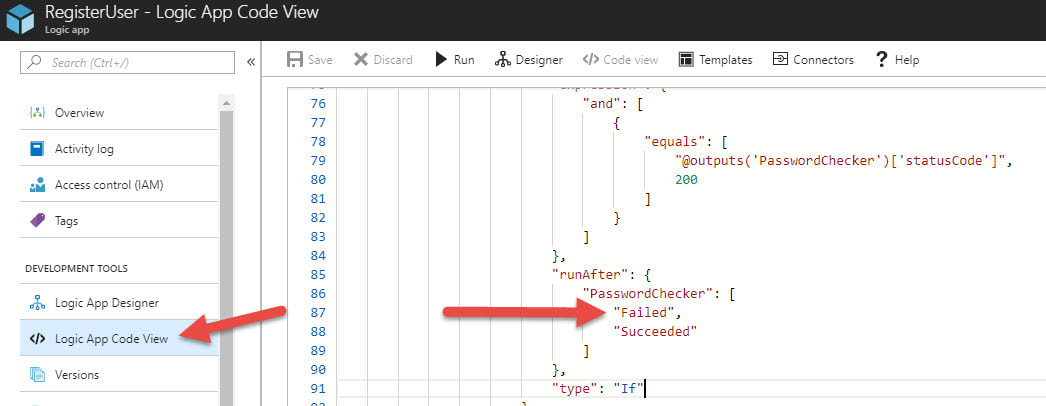
In order get the nested condition to work I had open the code view of the logic app and find the condition that was throwing the error. The fix was simple enough, I just had to add the Failed to the run after object for the function app. Once I updated the run after conditions then the invalid password workflow returned the error messages as desired.
Final Thoughts
Having to change the code for the logic app to handle the nested if condition was strange, but other than that everything worked great. I kept this simple as a Proof of Concept and as such I skipped certain things you'd want to do in production. In production you should never ever pass a password in plain text. You always should encrypt the password in transit and then hash it at rest. Also, if you wanted to you could add additional logging when the user failed password check. You probably would want to split the the password if false condition so you could handle invalid password differently from server errors. So while this is a very simple PoC I think it really shows the power of Logic Apps. The only code we wrote was the stored procedure to check if the user is already registered and then function app that validates the password. All the connections to SQL Server and inserting the data was handled by Azure for us.
I think Azure Functions are great, but the inability to use SQL Server is a major draw back. If we want to go serverless, but still use SQL Server are we just out of luck? Absolutely not! In this tutorial I'll design a simple Register User workflow using Azure Logic Apps and SQL Server. Let's get started by creating a logic app.
To start login into your Azure Portal, navigate to Resource Group you want to use (or create a new one) and then add a new Logic App. Make sure to select the correct subscription (if you have more than one), the resource group you want, location, and if you want analytics turned on. 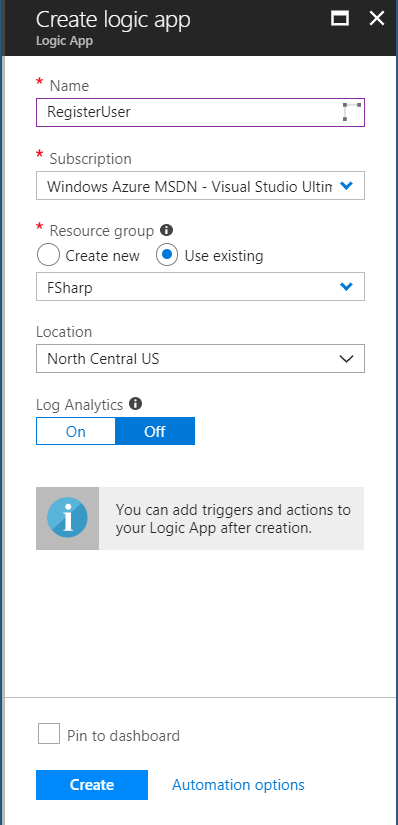
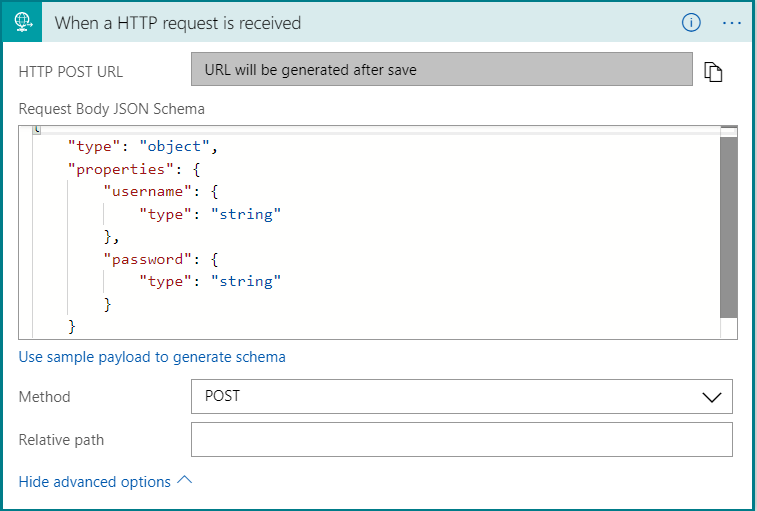
I want this logic app to be triggered by a post request. For this example the post body will be a very simple JSON object that contains only the username and password. On the logic app designer search for a HTTP request trigger. Expand the advanced options and select POST as the method. If you are new to creating JSON schema you can generate the schema from a sample payload. The next step will be to add an action that checks if the user already exists in the database and then follow one of two code paths.
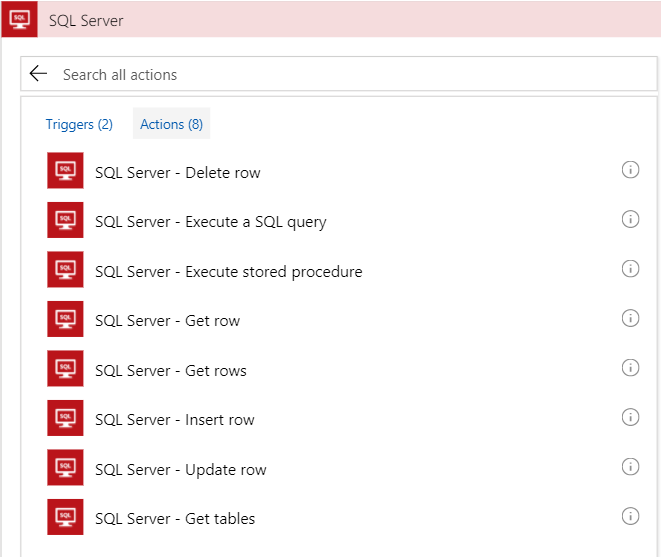
Before we add the if condition, we need to add the action that will check the database. To do that we need to add a SQL Server connector. Click on New Step then Add Action next click on SQL Server in the connectors section. At first I tried using the Get row action. The issue I ran into is that I could not find a way to check if the row exists. Maybe there is a simple way to do that, but I couldn't find it. After some google searches it seemed like the recommended solution was to use a stored procedure.
In my last post I described the database design for my payroll poc project. For that tutorial I created the database and data with SQL Server 2017 that I have running on my local development machine. That's fine for initial development, but I need that database in Azure for the poc to work as I'd like. In this tutorial I'm going to use the Azure Data Migration Assistant (DMA) to get my database in Azure. The migration assistant is a small program that you download from Microsoft then install and run against your local environment or dev server. When you start up the assistant you'll be greeted with a splash screen with a small walk through create a new project. You can create either an assessment or a migration project. It is a good idea to do the assessment before you blindly try migrating you database. The assessment will check for features that are enabled on your database that may not be compatible with the destination server. When I ran the assessment it flagged that I was using Windows Auth and that it wouldn't work on Azure SQL. After you fix any issues you can create a new migration project that will move your schema, data or both to the new destination. I setup an Azure SQL Database in Azure portal already that I'll use as the destination for the migration. Let's walk through the whole process from start to finish. The Assessment ProjectToday's post will introduce the basic database design I'm going to use for the Payroll POC project. As you can see the database is made of 9 tables and is centered around the Employee table. In a real, production system you would have dozens more tables covering things like retirement contributions, insurance deductions, and expense reimbursement, but for this POC this should be enough. Starting with the Status table, let's cover each table. The status is related to the employee table and is used as an enumeration for the employee's employment status (ie Active, New Hire, Terminated, etc). The employee table is the center of this universe. It only has a few basic fields like First and Last name, last changed, and references to status and address. The address is table is split out from the employee to allow employees to update their addresses while maintaining a history of previous addresses. The Is Active flag in the address table is used to determine the current address. In a production system you would probably have multiple addresses associated to a single employee (ie home, work) but for this I choose to stay with a single active address per employee. The Federal Tax table is unique because it has no foreign keys in it all. It's purpose to hold the multiple tax bands. There might be a band for 10% for income up to $15,000 per year and then another band at 15% up to $30,000 per year and so on. The percentage column is the tax percent and the upper limit is the max amount for that band. The system will use multiple bands as needed to calculate the total federal tax. Next is the state table. This table is largely intended to be an enumeration like the status table. After state is the state tax table. The main differences between State and Federal tax is that state is just a flat percentage, no bands, and state tax is optional. The pay rate table holds how much the employee makes either as an hourly rate or as a salaried position. I considered using a pay type flag, and in production you may want to, but decided to simplify the table and just allow both hourly rate and salary to be null. The Time table is the record of how many hours an employee worked between the start date and end date. The hours worked are recorded for salaried employees, but aren't used in the calculator. For hourly employees any work over 40 hours per week will earn time and a half (1.5 times their normal hourly rate). The last table is the check history table. Initially this table is empty and is only populated after the payroll engine is run. It holds the check date, the total amount earned, how much tax was taken out for state and federal and then finally the net amount paid to the employee. Each table also has an ID and Last Changed (or almost every table). The ID field for all tables is just an identity column starting 1 and increment by 1 on each insert. The Last Changed is a required DateTime field but the default value is set to GetDate() in MS SQL Server. Finally, in in the interest of keeping thing simple I did not add any referential integrity to the foreign keys. That's it for the database design. Nothing too strange and I'm not handling all the use cases a full system would need, but this should be enough for this POC. I have attached the database backup file from SQL Server if you would like use it yourself. I populated all the tables, except for Check History, with a few records to get started. Thanks for stopping by and Happy Coding. 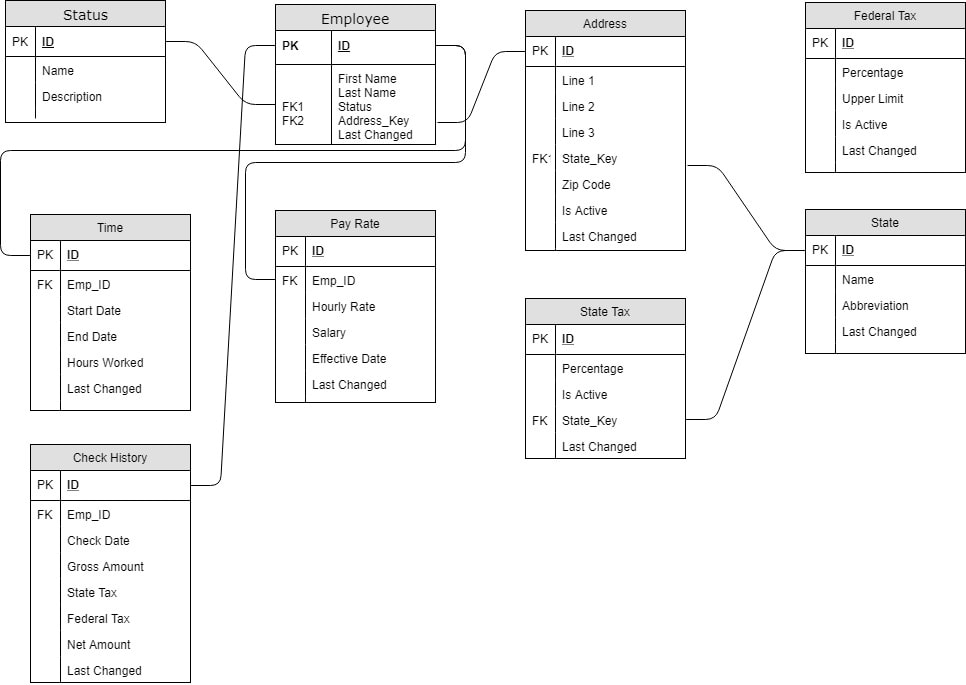
This is the first post in what I'm calling Quick Tips. The intention for small tips and tricks that don't require a long explanation or setup. Today's tip is regarding editing rows in SQL Server Management Studio. For this tip, I'll be using SSMS 2014 version 12.0.5203.0. I also downloaded the backup for AdventureWorks from here.  To edit some data you have a few options. One of which is simply to write out update statements and execute them against you database. That approach works fine you only have 1 or 2 rows to update or all the rows need to have the same columns updated to the same value and can be covered by the same where clause. If you more than a couple rows to update and they cannot be covered by the same where clause or need different values in the columns then you need to do something different. One option is to simply right click on the table and edit top 200 rows. 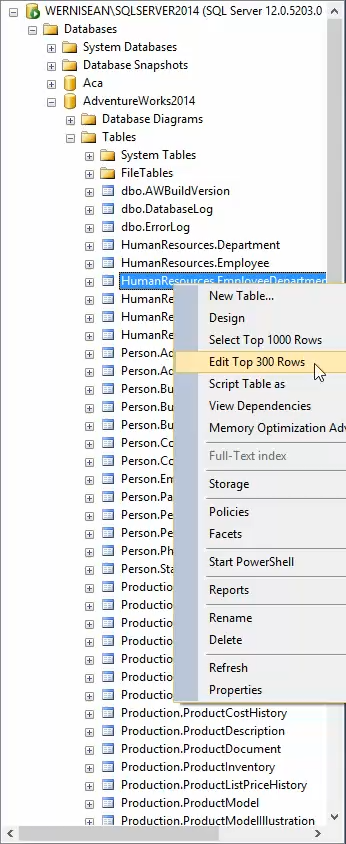 What do you do if you have more than 200 rows in your table? You can change the default rows returned (like I did to 300). How to do that is tip 1.
|
AuthorWelcome to The Blind Squirrel (because even a blind squirrel occasionally finds a nut). I'm a full-stack web and mobile developer that writes about tips and tricks that I've learned in Swift, C#, Azure, F# and more. Archives
April 2018
Categories
All

|
||
 RSS Feed
