|
I think Azure Functions are great, but the inability to use SQL Server is a major draw back. If we want to go serverless, but still use SQL Server are we just out of luck? Absolutely not! In this tutorial I'll design a simple Register User workflow using Azure Logic Apps and SQL Server. Let's get started by creating a logic app.
To start login into your Azure Portal, navigate to Resource Group you want to use (or create a new one) and then add a new Logic App. Make sure to select the correct subscription (if you have more than one), the resource group you want, location, and if you want analytics turned on. 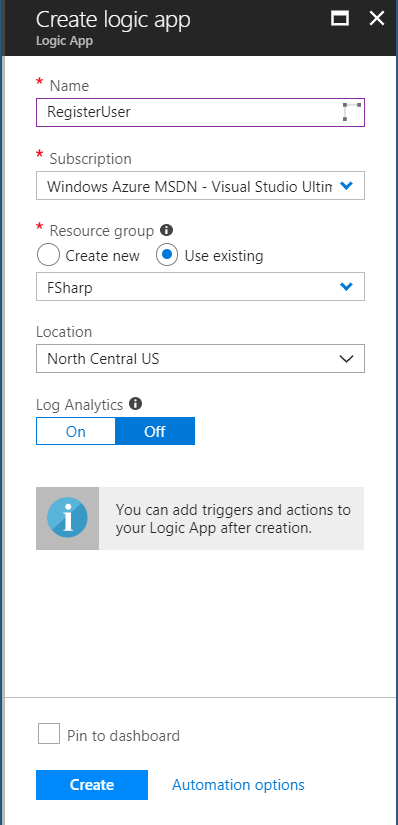
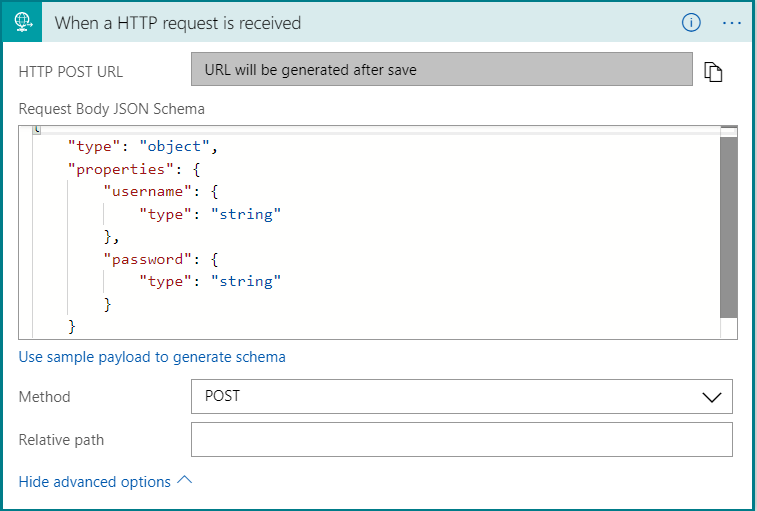
I want this logic app to be triggered by a post request. For this example the post body will be a very simple JSON object that contains only the username and password. On the logic app designer search for a HTTP request trigger. Expand the advanced options and select POST as the method. If you are new to creating JSON schema you can generate the schema from a sample payload. The next step will be to add an action that checks if the user already exists in the database and then follow one of two code paths.
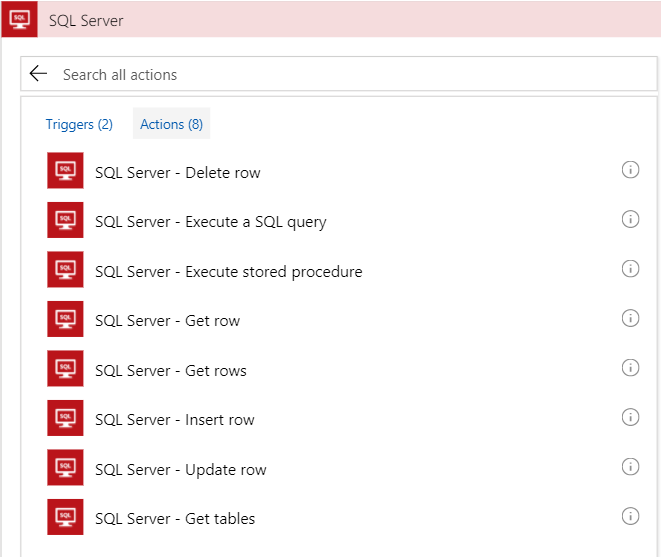
Before we add the if condition, we need to add the action that will check the database. To do that we need to add a SQL Server connector. Click on New Step then Add Action next click on SQL Server in the connectors section. At first I tried using the Get row action. The issue I ran into is that I could not find a way to check if the row exists. Maybe there is a simple way to do that, but I couldn't find it. After some google searches it seemed like the recommended solution was to use a stored procedure.
In my last post I described the database design for my payroll poc project. For that tutorial I created the database and data with SQL Server 2017 that I have running on my local development machine. That's fine for initial development, but I need that database in Azure for the poc to work as I'd like. In this tutorial I'm going to use the Azure Data Migration Assistant (DMA) to get my database in Azure. The migration assistant is a small program that you download from Microsoft then install and run against your local environment or dev server. When you start up the assistant you'll be greeted with a splash screen with a small walk through create a new project. You can create either an assessment or a migration project. It is a good idea to do the assessment before you blindly try migrating you database. The assessment will check for features that are enabled on your database that may not be compatible with the destination server. When I ran the assessment it flagged that I was using Windows Auth and that it wouldn't work on Azure SQL. After you fix any issues you can create a new migration project that will move your schema, data or both to the new destination. I setup an Azure SQL Database in Azure portal already that I'll use as the destination for the migration. Let's walk through the whole process from start to finish. The Assessment ProjectToday's post will introduce the basic database design I'm going to use for the Payroll POC project. As you can see the database is made of 9 tables and is centered around the Employee table. In a real, production system you would have dozens more tables covering things like retirement contributions, insurance deductions, and expense reimbursement, but for this POC this should be enough. Starting with the Status table, let's cover each table. The status is related to the employee table and is used as an enumeration for the employee's employment status (ie Active, New Hire, Terminated, etc). The employee table is the center of this universe. It only has a few basic fields like First and Last name, last changed, and references to status and address. The address is table is split out from the employee to allow employees to update their addresses while maintaining a history of previous addresses. The Is Active flag in the address table is used to determine the current address. In a production system you would probably have multiple addresses associated to a single employee (ie home, work) but for this I choose to stay with a single active address per employee. The Federal Tax table is unique because it has no foreign keys in it all. It's purpose to hold the multiple tax bands. There might be a band for 10% for income up to $15,000 per year and then another band at 15% up to $30,000 per year and so on. The percentage column is the tax percent and the upper limit is the max amount for that band. The system will use multiple bands as needed to calculate the total federal tax. Next is the state table. This table is largely intended to be an enumeration like the status table. After state is the state tax table. The main differences between State and Federal tax is that state is just a flat percentage, no bands, and state tax is optional. The pay rate table holds how much the employee makes either as an hourly rate or as a salaried position. I considered using a pay type flag, and in production you may want to, but decided to simplify the table and just allow both hourly rate and salary to be null. The Time table is the record of how many hours an employee worked between the start date and end date. The hours worked are recorded for salaried employees, but aren't used in the calculator. For hourly employees any work over 40 hours per week will earn time and a half (1.5 times their normal hourly rate). The last table is the check history table. Initially this table is empty and is only populated after the payroll engine is run. It holds the check date, the total amount earned, how much tax was taken out for state and federal and then finally the net amount paid to the employee. Each table also has an ID and Last Changed (or almost every table). The ID field for all tables is just an identity column starting 1 and increment by 1 on each insert. The Last Changed is a required DateTime field but the default value is set to GetDate() in MS SQL Server. Finally, in in the interest of keeping thing simple I did not add any referential integrity to the foreign keys. That's it for the database design. Nothing too strange and I'm not handling all the use cases a full system would need, but this should be enough for this POC. I have attached the database backup file from SQL Server if you would like use it yourself. I populated all the tables, except for Check History, with a few records to get started. Thanks for stopping by and Happy Coding. 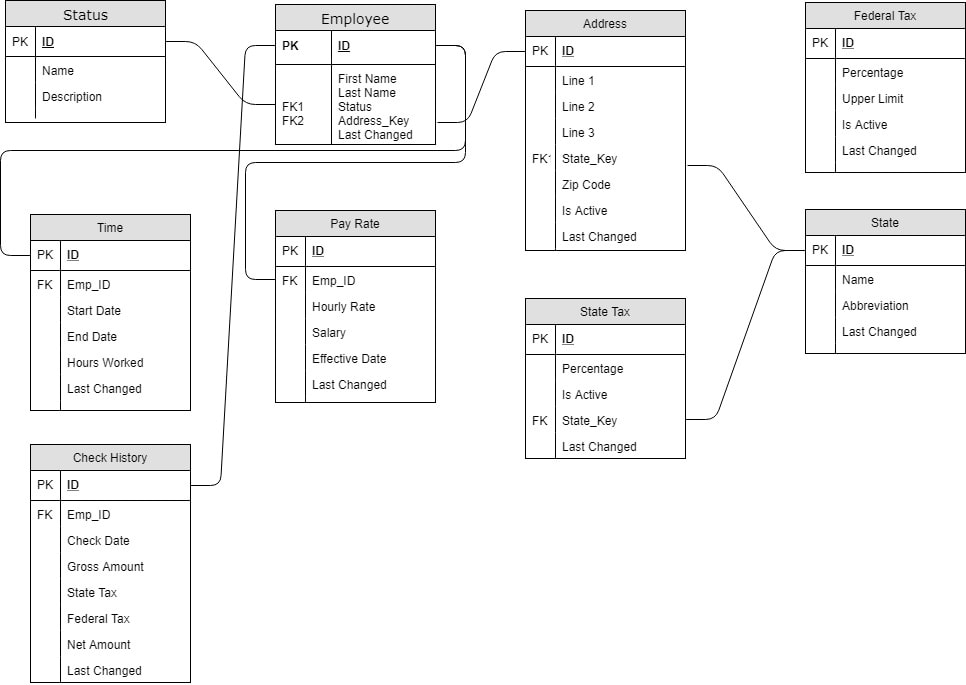
If you don't know, Function Apps are one of Azure's Serverless offering. They are small pieces of code that you can write in C#, F#, Javascript and Java (with more languages coming). Being serverless doesn't mean that the code doesn't run on a server, it certainly does, it just means that you can think less about servers. Functions can be triggered by a number of events, the one we will focus on is a HTTP call. Each function that gets created has its own unique endpoint that can be called from anywhere. In this tutorial we are going to create a very simple API that responds to Gets and Posts calls, add a proxy in front of the functions and test everything in postman. Let's get started. To begin go to the Azure Portal, sign in and create a new Resource Group that will contain your functions. It is a recommended practice to house all the things needed for an application (like the functions, data store, message queues, etc) in a single resource group. 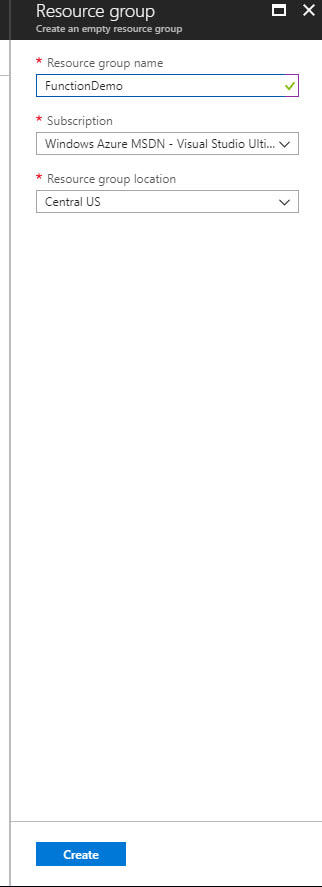 We now have an empty resource group. Let's fix that and add a function app. On the resource blade click Create Resource. Next search for Function App and create one from the Web & Mobile category. This function app is a container for functions. We will be creating the individual functions later.
Today I'm introducing a new project. Over the coming days and weeks I'll post more details about specific steps, features & functionality, and deployment to Azure. This post is to explain the high level details and workflow. The app is going to be a simplified payroll processing engine. There is going to be a very simple web front end, an API, a database, message queue, and the actual payroll engine. The main goals for this project are 1) to determine the difficulty in integrating multiple different languages together and 2) how to use Octopus to deploy everything to Microsoft Azure. I mentioned that I want to use different languages, but which languages? My plan is to use simple HTML and Javascript on the front end, C# and Web API for the middle API, Microsoft SQL Server for the Database, Azure Service Bus as the message queue, and finally I want to write the Payroll Engine in F#. The main focus of the project is the API, Message Queue, and Engine. So I chose to just so something simple with the front end so I could focus more on the back end and deployment aspects of the project. With the language basics out of the way let me explain the overall design. 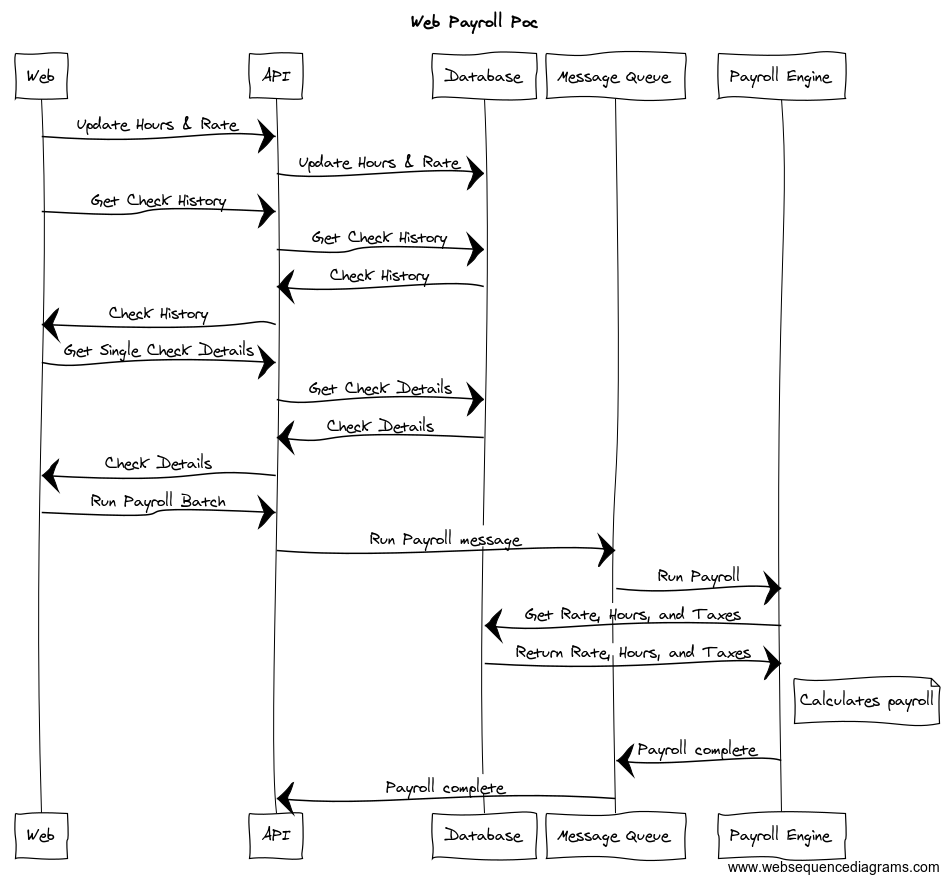 Imagine this as a payroll system for a small business. The employees of the business can have 1 of 2 roles. They can be either a regular employee or they can be an administrator. The admin role is a super set of the regular employee so they have all the same functionality as the employee plus the ability to update employee rates and run payroll batches.
For the standard employee role they can only get the details for a single check and view a list of all their past checks. Since these are simple read operations the user makes their request via the front end which calls to the API and which queries the database. The admin user can also update employee hours worked and also their current hourly rate. These are also simple CRUD operations so the API will talk directly to the database. So far nothing new or exciting here. Things start to get interesting when the admin wants to run a payroll batch for N number of employees in the company. When the time comes to run payroll so that employees can be paid things start to get more complicated. Running a payroll for an entire company or even a subset of employees can be a very long running process. This is were having a separate payroll engine can really improve things. Imaging you are the admin in charge of running payroll so everyone gets paid. You know that it takes awhile to calculate everyone's taxes and deductions but you don't want to bring down the API with such a long running process. This is where the message queue comes into play. When the admin wants to run a payroll, they will select all the employees and click the magic go button. The API will then add a message to the queue and stop there. The API won't be blocked waiting for all the payrolls to run and other employees can still view their check details and history as normal. It is very important that you use the message queue rather than a service bus with topics and subscriptions. The reason is that a queue will guarantee that only 1 worker (the payroll engine in this example) picks up the message and runs the payroll. Once the message is on the queue the payroll engine picks it up and gets the information it needs from the database. Then it begins the process of calculating the payroll. Once it is complete it publishes another message to the queue which is picked up by the API and then the customer is alerted that payroll is complete. We could have the API calculate the payroll to save design complexity, but I think splitting the workload like this provides more benefits than the drawbacks. There were two main problems that I wanted to solve, the first was scale. By splitting the engine out of the API you can scale both pieces independently of the other. The second problem that needed to be solved was time. Running a payroll is very complex process and it can take a very long time to complete. Using the message queue decouples the payroll engine from the front end and the API. The engine can take a long as it needs without impacting other users and the admin can close the browser window and go about their day until they get the message that payroll is complete. That's it for the introduction. Thanks for sticking with me this far. In the upcoming posts I'll go into more detail about each piece of the application and why I chose the language that I did. That's it for now. As always, Happy Coding. In my last post I mentioned a new F# repo on Github for a Simple Password Checker. In that example I was comparing and storing passwords in clear text. Since this is a terrible idea and something that you should NEVER EVER do in production I decided to come back and create a function to hash my passwords. During the course of development I ended up rewriting the function several times to be more function. So I thought I would share my process and walk through going from a C#/OO mindset to a more F#/ FP coding style. Before you get started you will need to add 2 open declarations to get the required modules. Required Modules
With that out of the way, let's start by looking how I would solve this problem with a C#/OO mindset. Get Password Hash Original
This function works, it does the job but there are several intermediate variables that are only used once and 1 mutable variable. So let's see how we can clean this up. Immutable by default and no state are some of the corner stones of functional programming, so let's get rid of that loop first. But how do we do that? We need something that will go over the array, accept an initial state, do some action and return the new state before repeating the process again. It turns out that the creators of F# thought about this and gave us the Seq.Fold function. Get Password Hash after removing loop
That's much better. All variables are immutable, we removed a loop and we are letting the compiler take care of building the hash string output. Next on our list is tackling those intermediate, single use variables. In C# we could chain all those calls into a single method call, but that would be difficult to read and we would have to start at the inner most method and work our way out. It would be nice to be able to read from left to right and clearly understand what is happening. That would be a dream, some would say even a pipe dream (sorry for the terrible pun :-)). Get Password Hash written functionally
And there we have it. We have gone from a 7 line function with 5 intermediate, single use variables, 1 loop and 1 mutable variable to a 2 line function with a single intermediate variable, 0 loops, and no mutable variables. I left the sha512 variable by itself because I wanted to use the 'use' keyword. Use in F# is the same as using in C#. That's it for today. Stay tuned as I add user registration via a front end API and publish all this to Azure.
Hope you learned something and enjoying this post. As always, Happy Coding. I've been reading Isaac Abraham's book Get Programming with F#. It's been a very good introduction to the F# language, syntax, and operators. During one of the chapters that discussed folding, mapping, and filtering lists, arrays and sequences we created a simple validator program. I decided to extend it a bit and add the ability to look up previous passwords in a database. I created a repo on github and started on my simple password checker. After searching for recommended data access solutions I settled on trying Fsharp.Data.SqlClient as my ORM. Being totally new to Fsharp and this library I ran into a few issues and thought I'd share my learnings in this, the second, entry to the Quick Tips series. 1). The first thing I learned was that the client is activity checking your database schema as you are typing your query. So if you misspell a column name or don't add [] around an object that is a reserved SQL Server keyword you will get compile time errors. This was totally new to me and took me awhile to figure why I was getting a compiler error. Now that I know that's what happening I really like the feature. The downside that I can see is that it forces you to design and create your database before you start coding. 2). I was having trouble mapping the output results to my domain record. So I started experimenting with the different ResultType options. 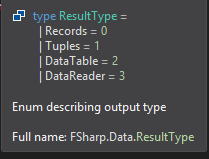 Here you can see how I specified the result type when creating the command provider. If you do not supply a type then the default of Records will be used. The command also provides a normal Execute function, which I could have used since I just called Async.RunSynchronously right away.  3). After continued experimenting, I found that I did not actually need a domain object for this example. Normally, in C# I would have created a simple POCO and used that as a DTO. Since the F# compiler has a stronger type system, even for dynamic objects, I did not need to create a DTO. Instead what I was able to do was access the columns by name in the rules engine without any translations.  And then I was able to simplify my query. Notice that I dropped the AsyncExecute and the Seq.Map. The ResultType.Records is the default so you do not need to supply it like I did.  That's it for this quick tip. Let me know what you like and as always. Happy Coding.
This is the first post in what I'm calling Quick Tips. The intention for small tips and tricks that don't require a long explanation or setup. Today's tip is regarding editing rows in SQL Server Management Studio. For this tip, I'll be using SSMS 2014 version 12.0.5203.0. I also downloaded the backup for AdventureWorks from here. 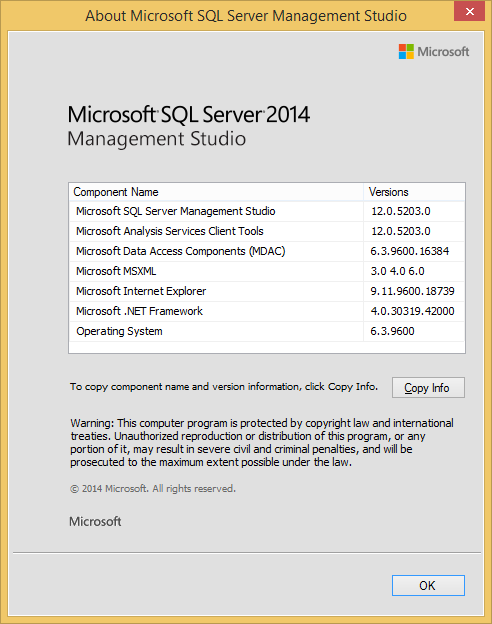 To edit some data you have a few options. One of which is simply to write out update statements and execute them against you database. That approach works fine you only have 1 or 2 rows to update or all the rows need to have the same columns updated to the same value and can be covered by the same where clause. If you more than a couple rows to update and they cannot be covered by the same where clause or need different values in the columns then you need to do something different. One option is to simply right click on the table and edit top 200 rows. 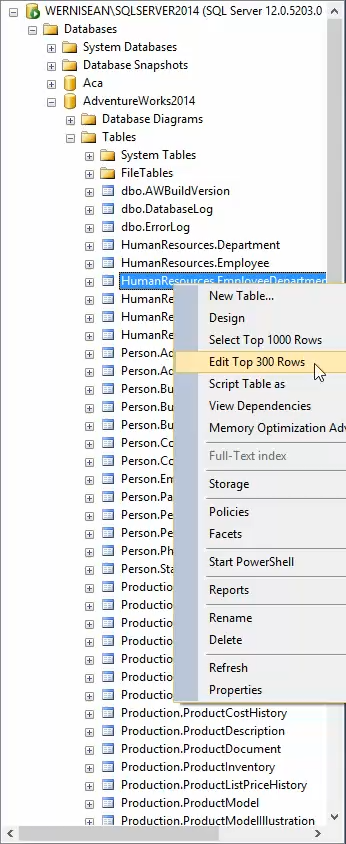 What do you do if you have more than 200 rows in your table? You can change the default rows returned (like I did to 300). How to do that is tip 1.
I've been toying around with native iOS development using swift on and off for about a year now. One topic that I haven't looked into as much is how to do automated testing. I've looked at XCTest but I just don't like that I have to start all of test names with the word test. I believe that the test name should descriptive of the work being tested and appending each test with the word test does not make sense to me. So after some searching I came across Quick and Nimble test frameworks. I'm coming from hybird mobile development and using Jasmine to test my JS files. So the Quick and Nimble structure is just like Jasmine with nested describes and it statements to structure your tests. So that combined with not having to append each test name with test was enough for me to go a little deeper with Quick and Nimble. I thought I would write this brief post about my experience setting up a sample application with Quick and Nimble to help anybody else out there looking for something besides XCTest. Be sure to checkout the finished project at my GitHub.
Intro and Pub/SubThis is post is going to be a little different. This time I'm going to show off a coding sample that I did for a company awhile back. The full code sample can be found here at my github. So the challenge was to create a solution that could process a remote file and use the data to answer a series of questions. Some of the things that I had to keep in mind were resource utilization, testing, ease of maintenance, and extensionability, add to be easy to add additional questions. Before I started I downloaded the files to get a feel for the data. Now I was told that the data was health care related, but was not told what the columns within the data meant, that was part of the challenge, so I had to do some additional research and infer as best I could. I found that one of the files was a CSV containing some information about medical practices within the UK. The second file, also CSV, was the prescriptions associated with each practice in a certain month. After some additional research I was able to a mapping for the columns in the second file to what they meant in the real world. Now armed with this information I was ready to start coding. As I was thinking about the structure of my code and what steps I would need to take I determined that there were two operations that I could not avoid. The first was that I had to process each file line by line in order to parse the data into something I could use in my code. The second was that I had to rerun the calculations for each question after each record was parsed. I could not just stop processing or skip certain objects since it could impact my calculations. Keeping the requirement of resource utilization in mind, one thing that I did not want to do was walk through each file line by line, parse that line, add that object to an in-memory collection, and then once I was done with the file walk the in-memory collection to do the calculations. I felt that would be bad for 2 reasons, 1) that I would be holding all of the data in-memory and 2) that would add many more operations (in addition to the two already identified) as I would have to walk the entire practice collection and the walk the associated prescriptions for each practice. With that in mind I decided that I wanted a way to do the calculations as soon as each record was done processing. My first thought was to use an event based model. I would raise an event as soon as each line was parsed. That would give me the benefit of redoing my calculations with each new object. The thing I didn't like was that I felt the event model would cause very tight coupling between the file that handled the data source and the file(s) that did the calculations. So I went looking for another answer. Finally, after some more thought and internet searching I landed on the Pub/Sub model. I chose the Pub/Sub model because it gave me the real time calculations I wanted without coupling my data source files to my calculation files. I added the Pub/Sub NuGet package to my solution (version 1.4.1 at the time) and was off to the races. Pub/Sub was super easy to implement. The package is a set of extension methods off of the base Object class so all of my entities had the publish and subscribe methods readily available to them. As you can see it was very simple to publish that an entity (practice in this example) was done being parsed. private void ParsePracticeFromStreamData(Stream downloadStream) { try { using (var stream = new StreamReader(downloadStream)) { string line = String.Empty; while (!stream.EndOfStream) { line = stream.ReadLine(); var prac = Mapper.Map<Practice>(line); this.Publish<Practice>(prac); } } } catch (Exception e) { _logger.LogException(MethodInfo.GetCurrentMethod().Name, e); } } In this method I'm taking the download stream and reading each line, using AutoMapper to map the CSV format to my entity and then Publishing the new Practice object. Since the publish sends out the practice object anybody that is subscribed to the practice will receive the practice object and can do whatever calculations they need. Subscribing to an event is just as easy. If one of the calculation files needed to handle practice data then in the constructor I would just subscribe like this. public BusyPractice() If a file did not need to do anything with the practice data it would not subscribe and then would not be notified. That's my Pub/Sub code in a nut shell.
|
AuthorWelcome to The Blind Squirrel (because even a blind squirrel occasionally finds a nut). I'm a full-stack web and mobile developer that writes about tips and tricks that I've learned in Swift, C#, Azure, F# and more. Archives
April 2018
Categories
All

|
||
 RSS Feed
